KEY POINTS TO LOOK AT WHEN SELECTING A HARNESS:
* Snug fit.
* UIAA /CEN mark.
* Climbing harnesses sold in the European Union carry the number CE 0082 and/or EN 12277
* Easy to buckle.
* Easy to adjust.
Types of harnesses
In climbing most harnesses are called sit-harnesses. Sit-harnesses are then divided into ordinary/normal and alpine design.
1) Ordinary/normal design is the most common harness, consisting of a waist band and two leg-loops connected by “risers” to the belay-loop. The belay-loop then connects the risers to the waist band. The leg-loops can either be adjustable or non-adjustable. These harnesses are manufactured with a wide variety of different amounts of padding for comfort, extra loops on the back of the waist band for dragging ropes, gear loops for carrying quick-draws etc. Some, such as those made by Black Diamond, have loops on the waistband that accommodate clips for carrying ice-screws.
Ordinary harnesses are best used by people who intend to climb regularly. It is worth paying the extra money for the padding, ease of use and comfort of this style of harness. Most companies make sizes small, medium, large and extra large. If you intend to use it for summer rock climbing and high mountains, then get one that has adjustable leg loops.
Some manufactures have ordinary harnesses designed for the female form and in feminine colours. The main difference in design is the risers and belay loop are longer and the waist-band is smaller and split in two parallel bands.
2) In the alpine harness the leg-loops are sewn into the waistband and also from the belay loop and tie in loop. See the pictures. As the name indicates this style harness is better suited to alpine climbing. There are two reasons for this: (a) The belay/tie in loop on an alpine harness stands up above the waistband. This is so the wearer’s centre-of-gravity is lower when sitting in the harness which is useful when wearing a heavy rucksack when abseiling or hanging on the rope in a situation such as would happen after falling into a crevasse. (b) The alpine style harness also usually does not have much padding for comfort. This is for lightness and because in high mountains, the padding for comfort is provided by the thick, soft clothing of the wearer used in cold conditions. They also generally have a lot of room to adjust for different sized people and to accommodate extra clothing in high mountains.
On the other hand alpine harnesses are cheaper due to their simple design and lack of extra comforts. And because they are very adjustable and have a low centre-of-gravity, they are useful for beginner climbers, children and any abseil situation where beginners will be involved.
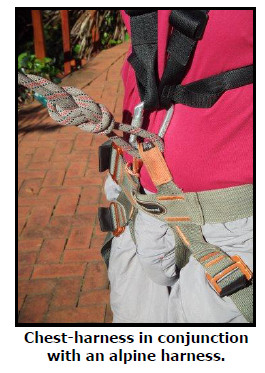
 There is a third type of harness, namely a chest-harness. A chest-harness must not used on its own, but in conjunction with a sit-harness. By adding a chest-harness to a sit-harness it prevents the user from turning up-side-down or if they do turn over, it prevents the wearer from falling out the sit-harness. The chest-harness is put around the wearer’s shoulders and either clipped to the sit-harness belay loop with a screw-gate karabiner, or tied to the loop with a short sling. They work best when used in conjunction with an alpine harness. It is best to use the shoulder harness when people are overweight (no waist line).
All sit-harnesses have a buckle system on the waist band and sometimes on the leg loops also. The older style is a conventional buckle system that the waist band belt threads through two steel slots and then must be double-backed. There are also systems where the securing band is automatically double-backed. This system is generally safer, as the wearer cannot forget to do the final double-backing.
Fitting a harness:
Any style of sit-harness should be adjusted so that the waist band sits snugly in the waist. Note around the waist, not the hips. The leg loops must also be fitted snugly. On the back of these harnesses are two thin adjustable straps from the waist band to the back of each leg-loop. These must be tightened so that they hold the leg-loop under each buttock. This is purely for comfort and not safety. If too loose, they allow the leg loop to hold around the hamstrings which is un-comfortable when sitting in the harness for long periods.
Tie in and connection points:
Ordinary and alpine harnesses use different methods for connecting to rope and/or karabiners. It is important that the user understands these two different methods. Pictures are provided for clarity.
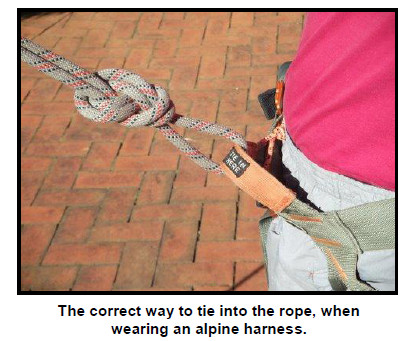
The ordinary design: When tying in on the rope for leading or seconding, always tie the rope through the leg-loop and waist band using a Figure 8 or Bow-line knot. See picture.
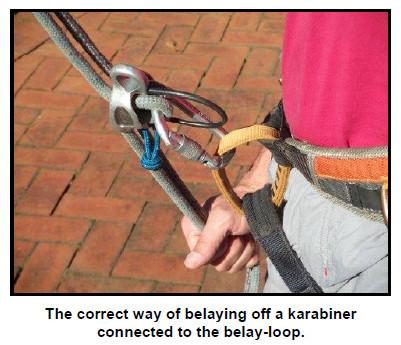
However for belaying or abseiling use the belay loop to connect into with a screw-gate karabiner.

 Note: never use a karabiner though the rope tie in points of the waist and leg-loops and then belay or abseil from this as it is very dangerous!
The reason is that when a force is applied, it does not allow the karabiner to swivel around easily and exert the force down the axis of the karabiner. This can cause cross loading or 3-way loading the karabiner, something it was not designed to do. It also often causes the force to be applied across the weakest part of the karabiner, namely the gate. Trust the belay-loop when using a karabiner – that is what it is made for.
On the alpine harness the belay-loop is used for clipping karabiners onto for belaying and abseiling. Un-like the ordinary harness it is also used for tying in of the rope for leading or seconding with either a Figure 8 or Bowline knot.
 Note: never use a karabiner though the belay-loop and through the waist band. For the same reasons as given above.
As mentioned earlier some harnesses have loops at the back of the waist band, which are used for dragging extra ropes in certain situations e.g. Multi day climbing, where a haul bag is dragged up the cliff. These loops are usually not rated for putting human life on.